Padding your success

It looks like we might be coming out of these lockdowns soon. We are all hoping that Covid is almost over. You’ve had lots of spare time but are you ready to get busy again? And more importantly is your plant ready?
One thing you probably have been neglecting is your equipment padding. Press pads and grid plates. Shirt unit padding. Form finishers. They are all critical parts of your production.
You better check now. Are they in good shape?
Whether you are busy or slow, your padding is getting worse every day. Fabrics break down and tear. Pads get hard. Touch-ups increase. Padding is not meant to last forever. It is a wear item that needs to be maintained to keep your quality up and your costs down.
It is just a fact of life – when business gets slow the first thing that is ignored is padding. It doesn’t get worse all at once. It is a gradual progression. To begin with you have to do a few more touch-ups. Eventually you may be touching up every garment. It’s time to have another look at things.
Press Pads
Press pads can be made from latex foam with a nylon cover, or silicone foam with a Nomex cover. Do you want to pay a little over and over again, or do you want to pay a lot and have it last a long time? My preference is the silicone pad. It starts firm and lasts a very long time.
The purpose of the foam is to hold the fabric in place during pressing. When you press the garment, steam and moisture soften the fibres, pressure through the foam shapes the fabric, and then the vacuum dries and cools the fabric so it retains its shape. If the fabric doesn’t dry completely on the press, it will dry on the hanger and the finish will not be flat or crisp.
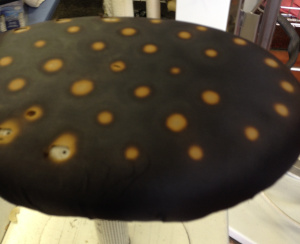
When the foam starts to break down you may not get steam or vacuum on the fabric. If the foam has gone hard, you cannot shape the fabric. Or if the pad has gone lumpy, you may be pressing in marks that you don’t want.

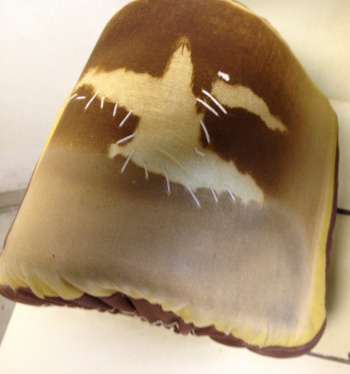
In the photo at left, the foam inside the pad has gotten hard and cracked. Steam blows through the cracked areas and there is no pressure in the depressed areas. The end result is that the pants come off the press with ripples that match the pad. This pad should have been changed a long time ago.
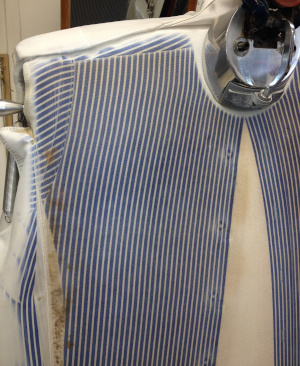
When you install a pad, you need to wipe the buck clean and ensure that the steam/vacuum holes are open. A water stain on a grid plate or press pad may indicate a leaking steam valve or a bad steam trap.
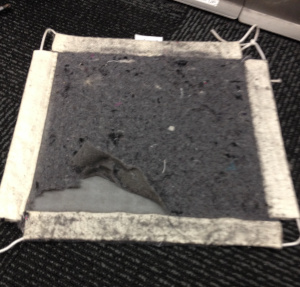
Grid Plates
Grid plates last much longer than press pads but they don’t last forever. Check that the fabric is clean and that there are no rust or water marks. Check that there is still some resilience to the padding.
Grid plates often have two layers of expanded aluminum, plus fabric to diffuse the steam before it goes through the fabric. They will also have either a 20-oz. flannel pad, a single layer of fabric, or even an aluminum surface coated with Teflon. The flannel grid plate gives a softer finish. The Teflon plate is hotter and will give a crisp pleat, but if you are not careful you can also put shine on wool fabric.
While you are checking things, please confirm that your pressers are not using head steam and vacuum at the same time. That will definitely cause shine or moiré markings on the fabric.
Head steam first, pause, then vacuum, pause and open the head, then vacuum again.
Collar-and-Cuff Presses
The collar-and-cuff press may be one of the most neglected machines in your plant. They run steady and almost never break down. So they get ignored – until you have a problem.
“I keep breaking buttons. What is wrong?” The padding on your collar-and-cuff press has gone hard. That’s like pressing the buttons between two pieces of steel. Of course they are going to break.
If the cover has torn, you can bet the pad has gone hard. Never mind trying to stitch it up. Just change it.
The standard pad/cover for a collar-and-cuff press is a 50-oz. flannel with a nylon cover. It is good for about 10,000 shirts. When the cover tears, the pad is flattened. Just replace them both.
A more expensive option is a silicone pad with a Nomex cover. That combination should last around 50,000 shirts. Think about the money you can save on labour by changing the pads. And if you tie the covers on carefully, you could take them off and wash them halfway through if you need to.
Shirt unit padding
Shirt units are made up of lots of moving parts and precisely timed motions. And padding that shapes, stretches and dries the fabric. And every time you press a shirt the padding is closer to being worn out.
Most shirt units have counters so you can easily monitor when it is time to change the padding. Again, you have a choice between flannel pads and silicone pads. Good padding will cost a few cents a shirt. Not very significant when you are charging $3 or $4 for a shirt.
One thing most people don’t monitor is their cuff clamps. They almost never wear out, but they can lose their ‘stickiness’ and they don’t hold the cuffs properly.
Every time the padding is changed, the machine should be inspected to ensure everything is working properly. A shirt press is a ballet of motions. If one of those motions is off by a few hundredths of a second, you may have to hire a second touch-up person. Check that everything is moving properly. Watch and listen to the machine. Then inspect a few shirts. You may also be able to turn the blower off so you can hear the machine sounds more clearly.
If you think you have a problem, have your technician look at it. If you start making random adjustments, you may make things much harder for your technician when you do call him.
Form Finishers
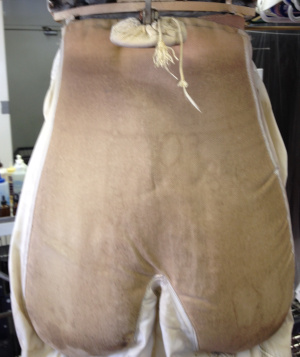
Form finishers and pant toppers also need some attention. The covers and pads break down with use. When you change them, take a few minutes to ensure that everything is moving properly. Do the clamps not hold tight or do the expanders push too hard? There are probably air regulators that are out of adjustment.
You should also check that the blower is working properly. There may be a screen to keep the lint out of the fan. They are not cleaned very often but they are a critical part of the machine. Air flow is what shapes and dries the fabric.
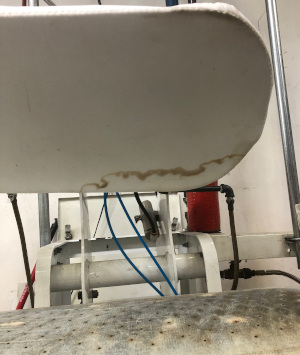
When you have the cover off listen for steam leaks. Steam leaking through this puff iron has created holes in the fabric.
Save some Money
Changing padding yourself is one way you can save some money, but only if you do it right. Incorrectly installed padding doesn’t last as long and it may cost you more in touch-ups.
If you are not certain how to do it, there are many resources available. Most press manufacturers have detailed instruction in their manuals. Some also have videos giving step-by-step instructions. Pad manufacturers also have videos and training.
The easiest way to learn would be to hire your technician to help you change it the first time. Then you should be able to do it yourself – but make sure you pay attention. There are details that have to be just so, or things don’t work properly.
Whether you do DIY or hire someone, it has to be done. Monitor your padding and your touch-ups. Don’t let your costs get out of line.
So am I trying to twist your arm into spending more money? No, I’m explaining how spending money on padding can save you money in wages and keep your customers happy.
Related Posts


About The Author
Kevin Marois
Kevin Marois founded Calgary-based Integrity Mechanical in 2003 to serve plants in Western Canada. He writes on issues related to equipment, its purchase, maintenance and use. You can reach Kevin at imi@telus.net, or via his website, www.imicanada.ca.